")
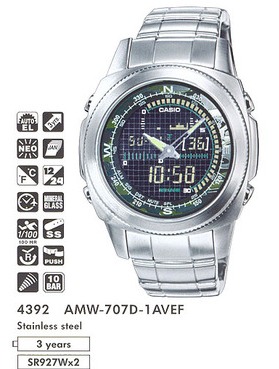
With each transition to winter-summer time and back, you have to wrestle and remember: how to translate the hands of the Casio AMW-707 to the electronic one, that is, synchronize the analogue clock with the electronic one.
Therefore, I decided to bring the official instructions in the form adequate to human perception.
Watch features:
- Type: quartz, male;
- Case material: stainless steel;
- Glass: mineral;
- Protection: waterproof WR100 (10 atm) - scuba diving;
- Energy source: battery;
- Sports functions: stopwatch, countdown timer, thermometer;
- Display: dates, perpetual calendar, date, month, day of the week;
- Display backlighting: fluorescent;
- Backlight arrows: phosphor;
My reviews on Yandex Market:
- Advantages: Completely stainless steel. You can wash in them. Absolutely no corrosion. Excellent accuracy. The glass is durable, not sapphire, but very strong. Excellent Japanese quality.
- Disadvantages: The main drawback can be seen in the picture - in the morning the hour hand closes the date. No more flaws.
- Comment: For three years, no complaints. The only problem - without instructions - nowhere. Montana watches are more intuitive. I chose them for myself, because of allergies that appeared on my hand because of domestic watches, which are not clear by whom and where they are made.
CASIO Module 4392
User's manual
First read this important information.
Battery
In the watch you purchased, the battery is installed at the factory and must be immediately replaced at the first sign of power failure (the backlight does not turn on, the display is dim) from your dealer or distributor CASIO.
Water protection
Clocks are classified according to discharges (from I to V) in accordance with the degree of their protection from water. Refine the discharge of your watch using the table below for proper operation of your watch.
Care for your watch
- Never try to open the case and remove the back cover.
- Replacing the rubber gasket that protects the watch from water and dust, should be done every 2-3 years.
- If moisture gets inside the watch, check it immediately with your nearest CASIO dealer or distributor.
- Do not expose the watch to extreme temperatures.
- Although the watch is designed to use them in normal conditions, however, you should avoid rough handling and prevent them from falling.
- Do not fasten the strap too much. A finger should pass between your wrist and the strap.
- To clean the watch and the strap, use a dry soft cloth or a soft cloth dipped in an aqueous solution of a mild neutral detergent. Never use highly volatile substances (such as benzine, solvents, spray cleaners, etc.).
- When you do not use your watch, store it in a dry place.
- Avoid contact with petrol, cleaning solvents, spray aerosols, adhesives, paints, etc. on your watch. Chemical reactions caused by these materials damage the gaskets, case and polish the watch.
GENERAL DESCRIPTION OF OPERATING MODES
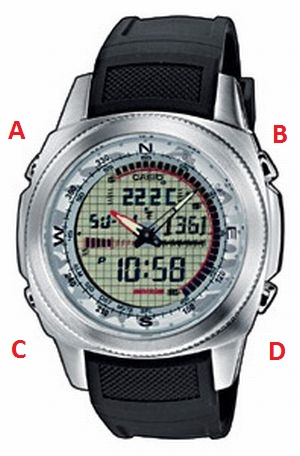
The figure shows a general view of the clock in the mode of the current time.
Press the “C” button to go from discharge to discharge in the following sequence:
- Current time mode > Notebook mode > Temperatures > Stopwatch mode > Timer mode > Countdown > Beep mode > World time mode > Analog time mode > Current time mode.
- In any mode, press the “B” button to turn on the display backlight.
Current time mode
In Current Time Mode, pressing the “A” button toggles the display of the temperature reading and temperature graph display.
Set time and date
- Press and hold the “A” button in Current Time Mode. The image seconds will blink.
- Press the “C” button to go from one digit to another in the following sequence: Seconds > DST (Daylight Saving Time) > Time Difference versus Greenwich Meaning > Hours > Minutes > 12/24 hour time format > Year > Month > Number > Sensor Calibration Temperature > Temperature Unit Switching > Seconds.
- If you selected seconds for correction (the image flashes seconds), press the “D” button to reset the seconds counter value to 00. If you press the “D” button with a seconds counter between 30 and 59, the counter value will be set to 00 and 1 will be added to the minutes counter, if the seconds counter value is between 00 and 29, then the minutes counter will not change.
To change the minutes, etc., use the “D” button to increase and the “B” button to decrease.
- Holding the buttons down allows you to change values with greater speed.
- The day of the week is set automatically according to the date.
- You can set the time value in the range of 2000g. until 2099.
To turn summer time on/off (“DST” indicator), press the “D” button. To switch to 12/24 time format, press the “D” button. When the 12-hour time format is selected, the “P” indicator indicates the afternoon time value. To enter the difference in GMT time, press the “B” and “D” buttons. When the settings are complete, press the “A” button to return to the Current time mode. If you do not press the buttons for some time, the clock will automatically switch to Current Time Mode.
Analog time mode
In this watch, the analog time (in other words, the clock hands) is synchronized with the current time value. Therefore, there is no need to install it. However, if for some reason the value of the analog time does not match the value of the current time, you should make the following settings. To convert the analog time, press the “C” button to go from discharge to discharge in the following sequence:
- Current time mode > Notebook mode > Temperatures > Stopwatch mode > Countdown timer mode > Beep mode > World time mode > Analog time mode;
- In Analog time mode, press and hold the “A” button until the flashing current time display appears;
- Use the “D” button to set the current time value. Each press of the “D” button increases the time by 20 seconds. Pressing the “B” button while pressing the “D” button allows you to change values at a faster speed. To stop quickly changing values, press any button. Pressing the “B” button while pressing the “D” button allows you to change values at a faster speed. To stop quickly changing values, press any button;
- At the end of the settings, press the “A” button;
- To return to the Current Time Mode, press the “C” button.
Thermometer mode
This watch is equipped with an ambient temperature measurement sensor. Proper temperature readings can be affected by body temperature, direct sundials or moisture.
- Measurements are taken at the beginning of every even minute.
- The clock also stores individual temperature values, which are then displayed on the temperature graph.
- All stored data in the watch’s memory can later be viewed in the Stopwatch Notebook Mode.
- Temperature readings are reported at 0.1° C (0.2 ° F).
- The temperature measurement range is from -10.0С to 60.0С (from 14F to 140.0F).
- You can select the temperature unit (degrees Celsius or Fahrenheit).
- If the temperature reading seems wrong to you, calibrate the sensor.
Ambient temperature measurement graph:
The clock automatically saves the measured temperature values at the beginning and at the end of each hour. On the basis of these data, a graph is compiled.
- Depending on the current time, the graph displays data measured at the beginning of the hour or vice versa at the end of the hour.
- Thus, the schedule is updated every 30 minutes.
- The graph displays data for the last 17 hours of measurement.
- Time is displayed on the horizontal axis of the graph, temperature value is displayed on the vertical axis (the right column represents the latest measurement data).
- If the measured temperature value is + 10C (+ 18F) higher than the previous hour, a blinking cursor will appear at the highest point of the hour column.
- If the measured temperature value is -10 ° C (-18° F) lower than the previous hour, it is not displayed on the graph.
- If for some reason the temperature measurement failed, a single point appears on the graph.
View saved temperature data:
Temperature measurements are automatically stored in the watch’s memory at the beginning and at the end of each hour. The total number of measured values does not exceed 50. You can view all the stored data in the Temperature Address Book mode. If the clock memory is full, the old ones are automatically saved to save the new data.
- In the Current Time Mode, press the “C” button to enter the notebook mode. When entering this mode, the display shows the latest temperature measurement data.
- To view the data, press the “D” button.
- If for some reason the temperature measurement failed, the display on the clock displays “-- -” instead of the temperature value.
Temperature Sensor Calibration: The temperature sensor is calibrated by the manufacturer and does not need prior calibration before use. With a significant error in the readings of the sensor can be re-calibrated.
- In the Current Time Mode, press and hold the “A” button until the flashing seconds indicator appears, which means the start of measurements.
- Press the “C” button nine times to enter the Calibration Mode of the temperature sensor.
- Use the “D” button to increase and the “C” button to decrease the sensor value.
- To reset the value to the original, simultaneously press the “D” and “B” buttons.
- You can enter temperatures in increments of 0.1° C (0.2° F) in the range of +/- 10C (+/- 18F).
- Calibration of the temperature sensor does not affect the stored temperature values in the clock memory.
- At the end of the settings, press the “A” button.
Change of temperature unit:
- In the Current Time Mode, press and hold the “A” button until the flashing seconds appears, which means the start of the settings.
- Press the “C” button ten times to switch to Temperature Change Mode.
- Then press the “D” button to switch the temperature unit: degrees Celsius - Fahrenheit (C - F).
- At the end of the settings, press the “A” button.
Stopwatch mode
The Stopwatch mode allows you to record individual periods of time, time with an intermediate result and time of double finish. The operating range of the Total Measured Time is limited to 59 minutes, 59.99 seconds.
a) Measurement of individual time intervals D (Start) - D (Stop) - D (Restart) - D (Stop) - A (Reset);
b) Time measurement with intermediate result D (Start) - A (Intermediate result, SPL indicator) - A (Continue) - D (Stop) - A (Reset) c) Double finish D (Start) - A (Split. First finish. On display the result of the 1st finish) - D (Second finish) - A (Cancel division. The display shows the result of the 2nd finish) - A (Reset).
Countdown Timer Mode
The countdown timer can be set from 1 to 100 hours.
- When the countdown reaches zero, a long beep sounds.
- In auto-repeat mode, when it reaches zero, a beep will sound, and the countdown will immediately start again from the previously set value.
Setting Timer Modes
- In the Timer Mode, when the watch displays the start time, press and hold the “A” button. The image of the start time hour will flash.
- Press the “C” button to go from one digit to another in the following sequence: Hours - Minutes - Auto-repeat - Hours.
- To enter the start time, use the “D” and “B” buttons.
- If you want to enter the value of 100 hours as a countdown time - set the value to “00:00”.
- To turn on (“ON”) / off (“OFF”) the auto repeat feature, press the “D” button.
- When the settings are completed, press the “A” button.
Timer use
- Press the “D” button in Timer Mode to start the countdown.
- Press the “D” button again to stop the countdown.
- You can continue the countdown by pressing the “D” button.
- In auto-repeat mode, when it reaches zero, a beep will sound, and the countdown will immediately start again from the previously set value. So it can be repeated up to 8 times.
- If auto-repeat is turned off, at the end of the countdown, a signal will sound 10 times, which you can stop by pressing any button. The value of the countdown time will go to the initially set (starting time).
- After stopping the countdown, you can press the “A” button to reset the countdown time to the starting value.
Beep mode
You can set a daily beep, which, when the set time is reached, will turn on for 20 seconds. If the hour start indication mode is on, a short beep will sound at the beginning of each hour. You can stop the alarm by pressing any button.
Setting the alarm time
- In the Beep Mode, press and hold the “A” button for 3 seconds. The digital value in the clock will flash as it is selected for installation. At this point, the alarm automatically turns on.
- Press the “C” button to go from one digit to another in the following sequence: Hours - Minutes.
- Press the “D” and “B” buttons to change the selected value.
- At the end of the settings, press the “A” button.
Checking the sound of the signal
- In Horn Mode, press the “D” button to check the sound of the signal.
- Turn on / off beep and start of hour display.
- In the Horn Mode, press the “D” button to go from one digit to another in the following order: All off - Daily beep only - Only the beginning of the hour indication - All on.
World time mode
In this mode, you can view the time in any of the 50 cities of the world (30 time zones). The value of world time is synchronized with the current, so there is no need to set it yourself.
- To view time values in other cities, press the “D” button.
- To enable daylight saving time: Use the “D” button to select the city whose summertime you want to set.
- To turn on (“DST”) / off summer time, press the “A” button.
Backlight
- In any mode, press the “B” button to turn on the backlight.
- The backlight automatically turns on when you hear any sound signals.
- The highlight of this clock is made on electroluminescent panels (EL) panels, the power of which falls after a certain period of use.
- When the display is illuminated, the watch emits an audible signal. This is because the backlight vibrates; it is not an indication of a clock failure.
- Illumination is difficult to see if direct sunlight falls on the clock.
- Frequent use of the backlight shortens the life of the battery.
Auto Light
Auto light is automatically turned on each time your hand is at an angle of 40° to the ground. Do not use the auto-backlight function when the light can damage or distract your attention. For example, when driving a motorcycle or bicycle. To turn on / off the auto-backlight, press and hold the “D” button for three seconds in the Current Time Mode.
Turn on / off button sound
In any mode, press and hold the “C” button to turn on / off the button sound.
Specifications
- Accuracy at normal temperature: + -15 seconds. per month.
- The current time mode: Hours, minutes, seconds, “AM” (A) / “Afternoon” (P), year, month, date.
- Calendar system: Automatic calendar since 2000 on 2099
- Other: 12/24 hour time format, summer time mode (DST).
- Analog time mode: stopwatch mode sensor measuring ambient temperature, a graph of measured values.
- Stopwatch notebook mode automatically saves up to 50 temperature values, measured at the beginning and end of each hour.
- Other: temperature sensor calibration, selection of temperature unit.
- World time mode: the current time in any of the 50 cities of the world (30 time zones).
- Beep mode: daily beep, hour start indication.
- Stopwatch mode: maximum measuring range 59 min. 59.99 sec.
- Measurement modes: separate periods of time, measurement with division, double finish.
- Countdown timer: measuring range 1 - 100 hours.
- Other: beep, auto repeat feature.
- Other: backlight (electroluminescent panels), auto backlight, on / off button sound.
Product information
- Name: electronic wristwatch / electronic-quartz men's watch.
- Brand: CASIO.
- Firm manufacturer: CASIO COMPUTER Co.
- Manufacturer Address: 6-2, Hon-machi 1-chome, Shibuya-ku, Tokyo 151-8543, Japan.
- Manufacturer country:
- Warranty period: 1 year.
- Products comply with GOST 26270-98 (p.4.35).
- Certificate of Conformity No. ROSS JP. AJ 46.DD00003.